Wednesday, 4 July 2012

Crackle Nail Polish Tutorial


Hey guys so today I'm going to show you how to do crackle nails.  My little cousin wanted me to do her nails like this the other day, so I thought I'd do a blog showing you how to do it using my mum as my hand model. :)  


I'm going to show you how to do a rainbow/peacock style nail crackle.


This is the product I am going to use and show you how to try and achieve the effect above. (the picture above is nails inc official picture, not my own).

what you will need . . . 


  • a base coat nail polish
  • a crackle nail polish
  • 4 bright coloured polishes
  • a top coat nail polish


step one

Firstly, as always ensure your nails are clean and free from any oils or polishes and file your nails into shape.  Apply a base coat polish to your nails to protect them from the colours you are going to apply on top of them.


step two

Applying the base colours to your nails.  I chose 4 bright nail polishes, nails inc; notting hill gate, spring mews, kensington park road and carnaby street.


Using each of the above colours paint your nails with each colour, (see picture below).  You can randomly paint your nails with the coloured polishes in any kind of pattern, don't worry about leaving any spaces or overlapping as it does not matter once you go to apply the crackle nail polish.


The picture below is how you want your nails to turn out, not meaning the patterns I painted but that each nail should have a section of colour of each of the coloured nail polishes you have chosen. 


step three

Once your nails have completely dried you want to carefully paint on your crackle polish, being careful not to paint too much on your nails, as they wont crackle or too little as you wont get a good coverage.  This may take a little patience and trial and error.


It will take a few moments, but as you nails dry the polish will start to crackle.

step four

Tidying up; don't worry if you get any polish onto the skin around your nails.  You can remove it with a cotton wool bud dipped in nail varnish remover.


Once you have tidied your nails up they should look like this.  As you can see it doesn't matter what your polish looked like underneath as you will only get glimpses of it through the crackles.


step five

Looking at your nails now you may think they look a bit dull and matt looking but this is why you seal them with a top coat of polish, which will also make them pop.


Links to the polishes used in this tutorial . . .


THIS IS MY FACEBOOK FAN PAGE, FEEL FREE TO LEAVE ME ANY COMMENTS/SUGGESTIONS ON MY BLOG OR WHAT YOU'D LIKE ME TO DO. OH AND UPLOAD SOME OF YOUR PICTURES FOLLOWING THE TUTORIALS I'D LOVE TO SEE THEM ALL! :D https://www.facebook.com/pages/DIY-NAIL-ART/321393224615432?cropsuccess 
                                        
Zane xx


Easy Summer Nail Art Flowers

hey guys, this is just a quick little blog showing you what else you can do with the kebab/cocktail stick technique you learnt in the leopard print blog.  Now there are many things, you just need to use your imagination but what I am going to show you is perfect for the summer, simple to do, quick and really pretty! 


Kebab stick Flowers


Here are a couple of examples of the kebab stick nails, you can either do a single flower or a few flowers on each nail or completely cover your nails in flowers.  Now I'm going to show you how to do this technique.


step one

Ensure your nails are clean of any oils or nail polish.  At this stage you can either apply a clear nail polish to your nails or a pale/lighter colour to the colours you have chosen for your flowers.


As my acrylic overlay is growing out I decided to apply a pale pink nail polish over my nail.

step two 

Using your kebab/cocktail stick make a centre dot for your flower by dipping the stick into a blob of polish on either an unwanted surface or piece of old plastic.  


I used an old envelope.


I also chose a pale yellow as the centre of my flower.

step three

Clean your stick and using the same technique as step two chose a different colour for the petals of your flower.  You are then going to place dots around the centre dot of your flower.


I chose a nice coral pink colour, don't worry if your flower is not perfect, it does not matter :)

step four

This step is optional, you may decide to just paint one flower on your nail but you can also repeat the above technique and add more flowers to your nail.

I decided to alternate the different colours of my flowers and kept them around the side of my nail.  As you can see some of the flowers are just half a flower (the purple one).

step five 

Once the polish has completely dried and set paint a top coat over your nails to seal them.


So that's it guys, easy peasy, super quick and really effective!  It can also be nice as something extra on your french manicure, or perhaps to add a bit of glam to your toes.

THIS IS MY FACEBOOK FAN PAGE, FEEL FREE TO LEAVE ME ANY COMMENTS/SUGGESTIONS ON MY BLOG OR WHAT YOU'D LIKE ME TO DO. OH AND UPLOAD SOME OF YOUR PICTURES FOLLOWING THE TUTORIALS I'D LOVE TO SEE THEM ALL! :D https://www.facebook.com/pages/DIY-NAIL-ART/321393224615432?cropsuccess 
                                        
Zane xx


Converse Nails Tutorial


Hey guys, today I'm going to show you how simple it is to paint converse trainers onto your nails.  These look super cute and even on just one finger is eye catching.  Why not co-ordinate them with you're own converse . . .


what you will need . . . 

  • a base coat polish
  • a top coat polish
  • five coloured polishes
  • a white nail polish
  • a black and a white nail art pen (if you don't have these you can use the kebab/cocktail stick technique shown in the leopard print tutorial and use a black and white polish)


step one

Ensure your nails are completely clean of any polish or oils, file your nails to the desired shape and paint on a layer of base coat polish.  This will prevent your nails from any coloured staining from your nail polish.


I used nails inc a&e advanced treatment as my base coat.  My nails may look a little strange but I have acrylic overlay on my nails, which are growing out.  This design can be painted on any kind of nail, acrylic overlay or not.

step two

Applying your coloured polishes, I picked five different colours and applied each colour to each of my fingers.


These are the 5 nails inc polishes I decided to use, from left to right; summer place, regents place, palace mews, stanhope gardens and the southbank.


Here are my nails with the above colours and with one coat of polish.

step three

Applying the white curved strip at the bottom of your nails once your base colour has completely dried.  This can be quite tricky, especially if you don't have a steady hand so just take your time and go slowly.  Start off with a small white strip and once you have your shape then go over it again making it a little thicker.  


You can use a white polish to paint these on, I used nails inc floral street, or your white nail art pen, using the brush side.


Paint a white curved strip on the end of each of your nails.

step four

Whilst you are waiting for the white strips to dry you can carefully apply the black lace holes on the remaining coloured part of your nails using your black nail art pen or your or black polish with a kebab/cocktail stick.


You want to apply 6 dots, 3 on each side, trying to keep them in line with each other.


Apply this technique to each of your nails.

step five

Once the black has dried you can use your white nail art pen/kebab stick to paint on the laces on your shoes.

Start at one dot and paint a stripe from that dot to the diagonal one.  Then starting at the parallel dot do the same thing, you will end up with an X shape.  Carry this out again on the remaining dots, finishing with what looks like two X's (see the pictures above).

Step six 

The white curved strip at the bottom of your nails should have dried and set by now, just double check.  Once you are sure the white has dried you are going to use your black nail art pen to paint on a thin black line.  You can either use the pen tip or the thin brush, whatever you are most comfortable with.


I decided to use the thin brush part of my nail art pen.

Using the thin brush I started about half way down the white strip, started at the side of the nail and painted a curved sweep into the middle.  I then repeated this process on the other side of the nail so the line met in the middle.


Apply this technique to each nail.  

It may be a little tricky doing this on your left hand if you are right handed or your right hand if you are left handed.  Just try different ways to hold your brush and perhaps steady your hand on something.  Once you have found a way you will stick with it.  How I paint with my left hand is a lot different to how I paint with my left.  I also tend to start by painting my right hand first as it usually takes longer than my left and at the beginning I always seem to have more patience! :D


step seven

Ensure your nails are completely dry before applying a coat of top coat as the black can streak and you don't want to ruin all your hard work.

Links to the polishes used in this tutorial . . .

THIS IS MY FACEBOOK FAN PAGE, FEEL FREE TO LEAVE ME ANY COMMENTS/SUGGESTIONS ON MY BLOG OR WHAT YOU'D LIKE ME TO DO. OH AND UPLOAD SOME OF YOUR PICTURES FOLLOWING THE TUTORIALS I'D LOVE TO SEE THEM ALL! :D https://www.facebook.com/pages/DIY-NAIL-ART/321393224615432?cropsuccess 
                                        
Zane xx


Friday, 29 June 2012

Heart Tipped Manicure Tutorial


Hey guys! Hope you are all enjoying my tutorials and finding them easy to follow.  Today I'm going to show you how to do a heart tipped manicure.  It's something a little different and I think stunning looking, perfect for those of you who like a rounded nail.


what you will need . . .

  • a base coat polish
  • a top coat polish
  • red nail polish
  • pink nail polish
  • a nail file


step one

Firstly you need to file your nails into a rounded tip, it's up to you how pointed you want your nails to be.  Then ensure you remove any polish or oils etc.


step two 

Apply your base coat to your nails as the red may stain.


These are the base and top coats I have used; nails inc kensington basecoat caviar and kensington topcoat caviar. *Links can be found at the end of the blog*

step three

Once your basecoat has dried apply the pink polish to each nail.


I used nails inc elizabeth street, as you can see in the picture above it's a nice subtle pink, nothing too strong, bright or white looking.


step four

Now that your nails have dried (I only used one coat) you are going to take your red, I used nails inc chester place to paint the hearts at the tips of your nails.


Trying to keep your brush as rounded as possible, either with the brush or with enough polish on the brush to make it look rounded.  You want to make a sweep on one half of the nail down to the point (see picture one, on the left) so you have half of your heart (see picture two, on the right).  Carry out the same technique on the other half of the nail to complete your heart (see picture three, at the middle).  Complete on each nail to complete your hearts on your hand (see picture four, at the bottom).


step five

Ensuring your hearts have completely dried and set apply your topcoat, as shown at the top of the blog I used nails inc kensington top coat caviar.


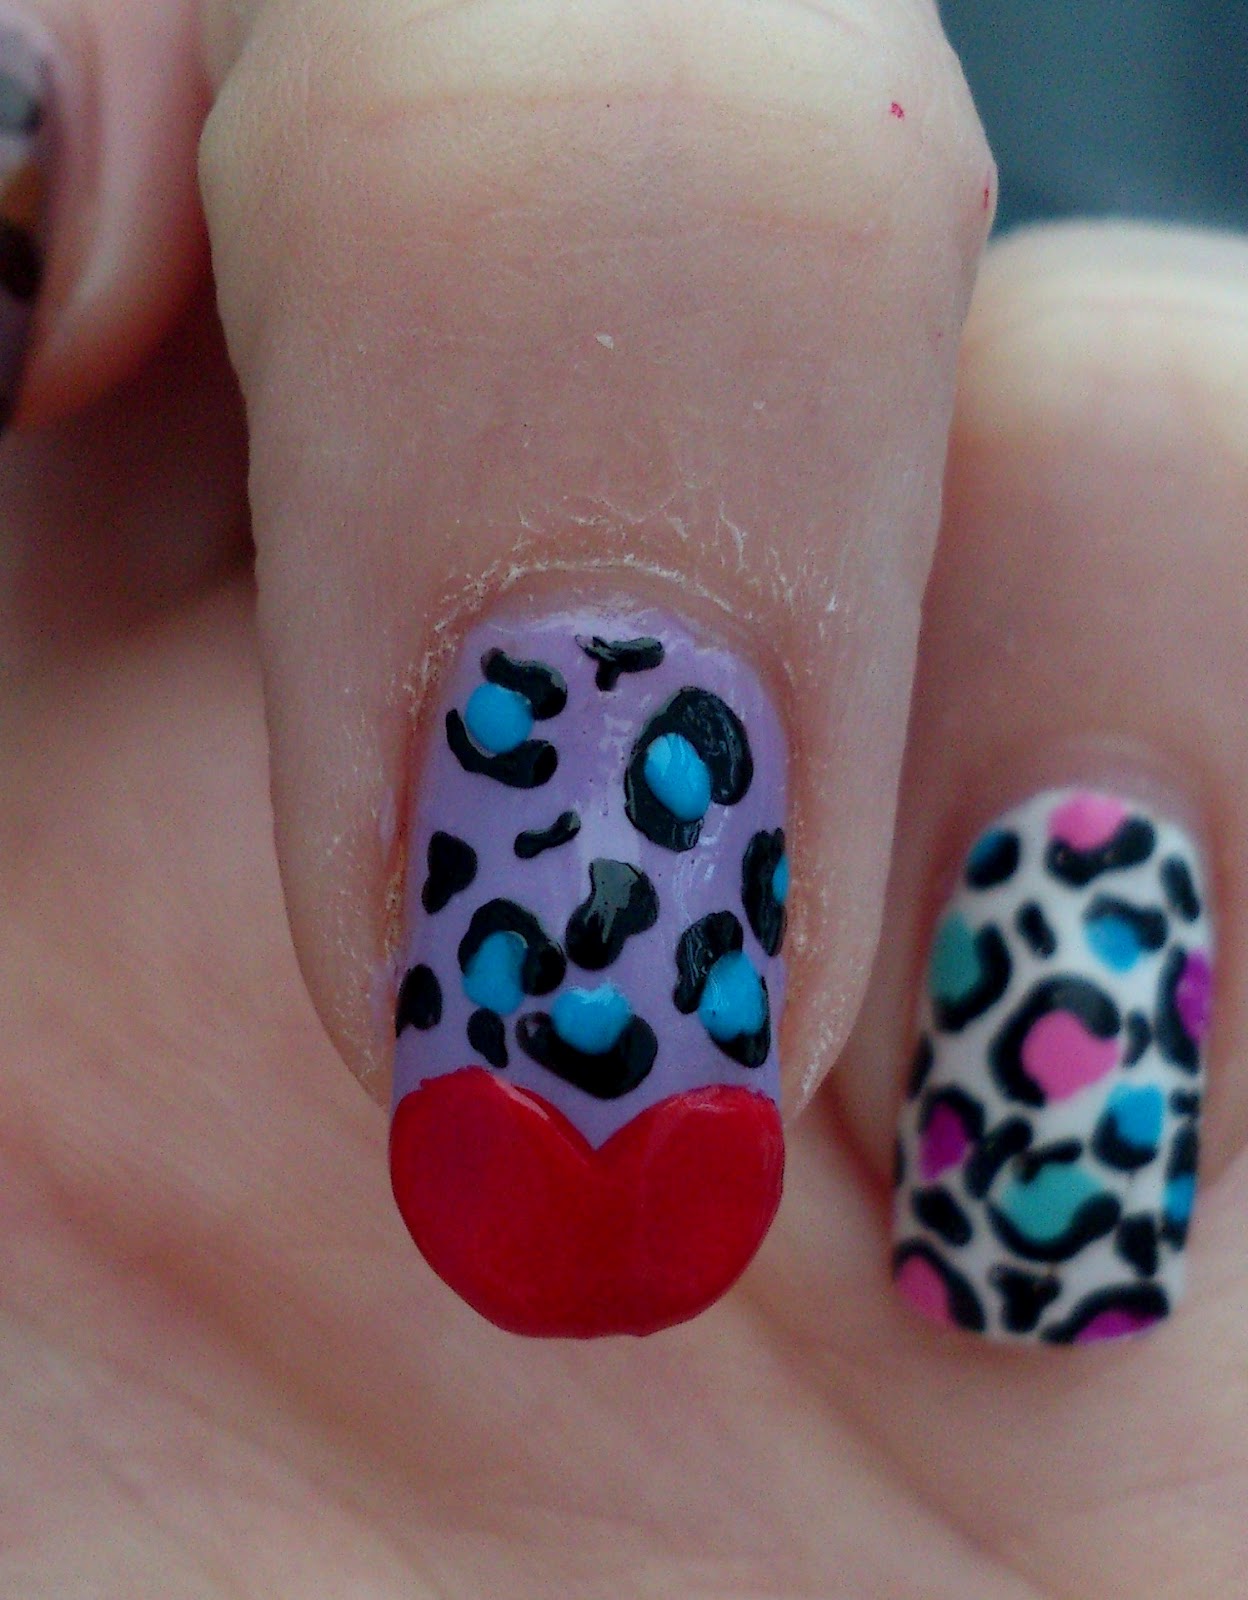
Now that you know how to do a heart tipped manicure and how to do leopard print nails (see my tutorial if you don't), why not try out the two together for something funky, different and eye catching!


Please excuse the dry skin around my nail, I'm in need of some TLC!

step one (A)

Using the same steps as above you are firstly going to file and clean your nails, apply a base coat, and once dry paint a coat of purple nail polish. 


You can use any colour as a base colour for this design, I decided on purple/lilac and chose nails inc palace mews.

step two (B)

Once the base colour has set and dried carry out step four above and apply the red heart to the tip of your nail.


step three (C)

Using two other colours and a kebab/cocktail stick you are going to paint the leopard print on the the remaining part of your nail.


I chose nails inc kensington park road for the centre colour of the leopard print and the black taxi polish for the outline.

step four (D)

Finally as always once your nails have dried and set you want to apply your top coat, I used nails inc kensington top coat caviar.


Have fun and be creative with the techniques you have learnt, feel free to use your imagination and put different colours and techniques together!

Links to the polishes used in this tutorial . . .


THIS IS MY FACEBOOK FAN PAGE, FEEL FREE TO LEAVE ME ANY COMMENTS/SUGGESTIONS ON MY BLOG OR WHAT YOU'D LIKE ME TO DO. OH AND UPLOAD SOME OF YOUR PICTURES FOLLOWING THE TUTORIALS I'D LOVE TO SEE THEM ALL! :D https://www.facebook.com/pages/DIY-NAIL-ART/321393224615432?cropsuccess 
                                        
Zane xx


OPI Nicki Minaj Collection Review


Hey guys! Today's blog is going to be about the OPI Nicki Minaj Collection, I know I'm always ranting and raving about nails inc but I'm always being told how great OPI is and thought I'd give it a go and see how it compares to nails inc.

I tried to find a link to buy this on the OPI website but was unable to, I found the site pretty tricky to use if I'm being honest.  If you type it into google however many websites come up enabling you to buy it.  I myself didn't buy mine online, I spotted mine in my local nail and beauty salon and purchased it from there. http://www.nailandbeautybar.co.uk/

time to put the polishes to the test 


I decided to try out these colours on my toes, I thought the pink and light green/yellow colour would be great summer colours.  So as always I removed all polish from my nails and filed and shaped them.

coat number one


These are my toes with one coat, the pink looked ok but a little streaky, the yellow/green colour looked horrible I really didn't like the shade, the dark green/blue colour came out well and the black glitter was very light. 

coat number two


These are my toes again with the second coat, they all look a lot better with the two coats on them, I'm sure you'll agree.  The pink evened out well without leaving any streaks, the colour of the yellow/green became a lot richer and better looking, the green/blue didn't really need a second coat, but with it it definitely makes the colour a lot richer and the black glitter look so much better with a second coat, there was a lot more coverage and more sparkle too. 


my review of the products


I found the pink polish to be quite thick and sticky and you really needed alot on the brush to try and avoid a lot of streaks.  The greeny blue colour again was quite a thick polish but went on really well (this was the best one for a one coat coverage).  Both the yellow colour and the black glitter were quite watery, hence why the first coat was so light.  However all with a second coat turned out well.  I personally wasn't that impressed with my first try of OPI products especially for the price they charge.  

If you use or have used OPI and found different results or recommend any I should try please let me know, I'd be really interested to hear from you and your opinion.

THIS IS MY FACEBOOK FAN PAGE, FEEL FREE TO LEAVE ME ANY COMMENTS/SUGGESTIONS ON MY BLOG OR WHAT YOU'D LIKE ME TO DO. OH AND UPLOAD SOME OF YOUR PICTURES FOLLOWING THE TUTORIALS I'D LOVE TO SEE THEM ALL! :D https://www.facebook.com/pages/DIY-NAIL-ART/321393224615432?cropsuccess 
                                        
Zane xx


Tuesday, 26 June 2012

Comic Strip Nail Tutorial


Hey guys, hope you are all liking my blogs and tutorials! Tut tut you lot, I'm still waiting for pictures! :) So today I'm going to show you how to do the comic strip nails.  These are fab, so easy to do and really eye catching! So why not follow these steps and give them a go this weekend . . .


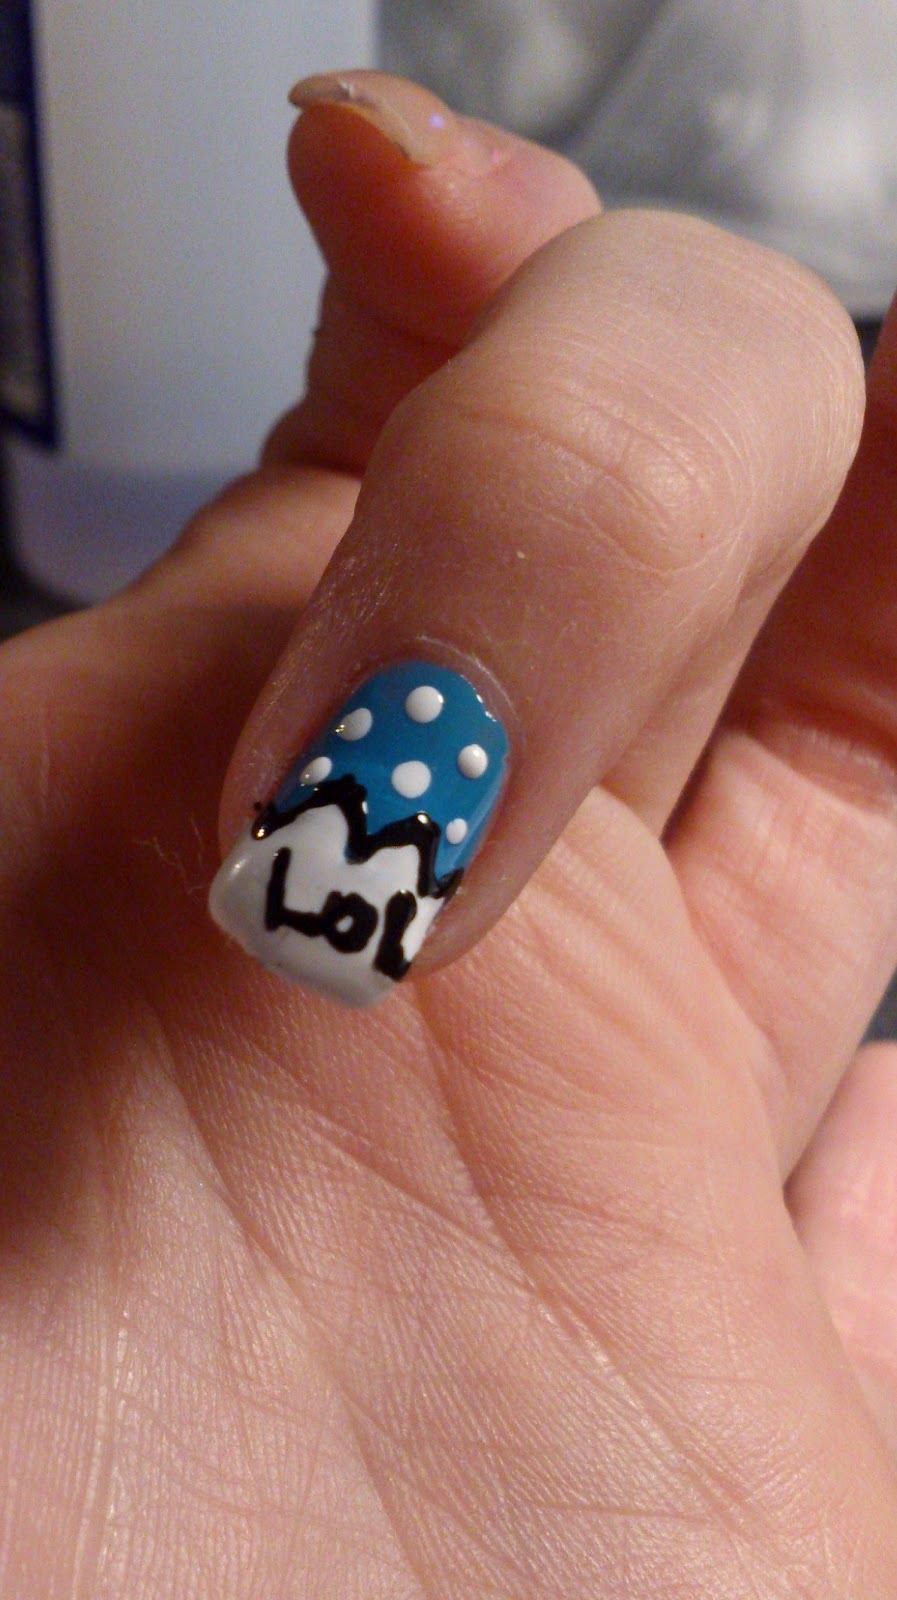
These are just 3 random nails of mine as I go through fazes of liking my nails all unique.  It just shows you how diverse nail art can be, you can either do every nail the same, every nail different or every nail the same bar one.  If you do decide to go for the last option then I'd say pick the nail art for your ring finger (the one beside the pinky).


Now I'm going to show you the nail art on just one finger but the steps apply to any nail you want to do, just change up the colours of polishes you use and what you want to write.

what you will need . . . 

  • a base coat 
  • a bright coloured polish
  • a white nail art pen
  • a black nail art pen
  • a top coat

This is the white nail art pen I use, I also use the black in the same brand.

step one


File and shape your nails (if needed) and ensure your nails are clean, no oils or polish.  Apply a base coat to your nails as bright colours can stain your nail. *Remember always make sure each layer of polish completely dries.*

step two 

Pick your bright coloured polish and apply one or two coats depending on the shade you want and how well the polish goes on.


This is nails inc kensington park road (for link see end of blog) with one coat, you may need two but I find I only need one as when I have the acrylics on my nails.

step three 


Using your white nail art pen you want to draw a zigzag shape, either at the tip or base of your nail and then fill it in.  You can either use the pointy bit of the pen or the brush, it's your own preference.


I used a little too much of the white here, as you can see it looks a bit thick and claggy looking.  It took forever to dry due to this!

step four


Whilst you are waiting for your white filled zigzag to dry you can add some dots to the rest of the nail.  I used the nail art pen again but as you can see from the pictures at the beginning of the blog I did paint one red with yellow dots.  You can pick whatever colour you want and if you don't have a nail art pen in the colour you want to use you can just use the kebab/cocktail stick.  (see http://www.blogger.com/blogger.g?blogID=7926081553613185029#editor/target=post;postID=5347760447589870587 for how to do this).


step five


Once the white has completely set and dried it is time to add the black outline and any comic style words or symbols you want to use.


Outlining your white zigzag really makes it pop, I outlined mine with the pointed tip of the black nail art pen as I feel you have more control with the pointed tip for smaller, more detailed things.


I picked 'lol' for this tutorial as it is pretty simple to write, but you can always practise different ideas on a piece of paper before you write it on your nails.

step five


This is the final step and I'm sure you've guessed it, time for the top coat.  I used the nails inc kensington caviar topcoat.


Links to the polishes used in this tutorial . . .


THIS IS MY FACEBOOK FAN PAGE, FEEL FREE TO LEAVE ME ANY COMMENTS/SUGGESTIONS ON MY BLOG OR WHAT YOU'D LIKE ME TO DO. OH AND UPLOAD SOME OF YOUR PICTURES FOLLOWING THE TUTORIALS I'D LOVE TO SEE THEM ALL! :D https://www.facebook.com/pages/DIY-NAIL-ART/321393224615432?cropsuccess 
                                        
Zane xx